
Growing Shallots
Many people prefer growing shallots to onions because of the delicate flavor they add to dishes as opposed to the more overpowering onion.
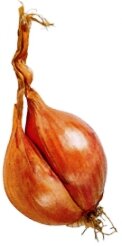
Shallots (Allium ascalonicum) are a great substitute for onions and you'll find growing shallots a breeze. They belong to the same family as garlic and onions and are good sources of nutrients like vitamin A and C.
Take advantage of their easy to grow nature to avoid shelling out big bucks in supermarkets for these flavor enhancing vegetables. What's more they last longer than onions when stored well—as long as one year!
Tender shallot leaves can also be used as chive substitutes.
Conditions for growing shallots:
Shallots, like onions, require well drained soil to thrive. So it's a good idea to take a few days to enrich the soil you intend growing shallots in. For this you'll require a sizeable quantity of rotten compost and to make sure the soil is friable and well drained.
Planting Shallots:
To plant shallots, make holes or create trenches for each row. In these holes or trenches, place small shallot bulbs pointy end up. Keep the shallot upright so that when you tamp the soil back in place, the tip of the bulb is just above the surface of the ground. Place the bulbs about 10-15cms (4-6") apart.
Tending:
Shallots have fine delicate roots and need watering whenever the soil appears to be dry and by making sure to weed the space between each bulb so competing plants don't grow there taking advantage of the rich soil and the sun.
Add another layer of rotten compost to the soil half way through the season or apply an organic fertiliser rich in nitrogen. Keep any mulch away from the developing bulbs after planting. Shallots need their bulbs to be almost above the soil.
Weeding, while essential, should be undertaken with utmost care.
That's all there is to tending your plants and growing shallots that are plump and healthy.
Harvesting shallots:

Shallots form clumps of bulbs, often up to 10 per plant. When you notice your shallot leaves turning yellow, take that as a sign to harvest your crop.
Refrain from grabbing the plant by its leaves and pulling it out of the ground. Instead dig around and lift them out with a fork. You'll find all the bulbs clumped together. It's not necessary to separate them right at this stage.
Air them out for about a month. This allows them to dry and that helps in preparing them for storage.
When they're dry hang them in a mesh bag or put them on a rack in a dark and cool room and they'll last you a minimum of nine months and up to a year.
How to Grow Shallots for Propagating:
You can make use of your first crop for growing shallots the next season. To do this pick out your best bulbs that are big and healthy and follow the same procedure as above.
Shallots pests and diseases:
Shallots are from the same family as onions (Allium cepa) but are very hardy. Any problems are the same problems onions are challenged with, so check out: Onion Pests and Diseases
Now you are an expert on growing shallots, check out more vegetables to grow: List of Vegetables
Back to HOME page: No Dig Vegetable Garden


The coolest little Newsletter around
Avoid the tragics — grab the tips.